
Like a vast majority of my fellow Earthicans, I am a Photoshop newbie. Launching PS on my computer starts a 30-second countdown, at the end of which I’m shaking in the corner, paralyzed by my image-altering inadequacies.
No, it’s not really that bad. But I truly am a Photoshop noob. Thankfully, I have Smashing Magazine to help. Writer Dirk Metzmacher recently penned an article called “Useful Photoshop Tips and Tricks for Photo Retouching”, which gives 17 such tips that can change your images, whether they’re personal or professional, for the better.
Some of the tips flew well over my head, as they could very well do for you. I wholeheartedly encourage you to read the Smashing article in its entirety, but here are three of the simplest tips that can really make a difference.
1. Sunsets
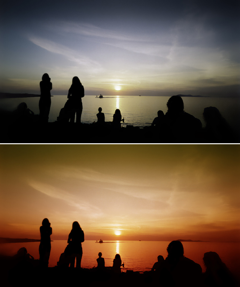
 Have you ever snapped a photo on an exotic beach, amazed by the beauty of the setting sun and how it seemed to set the surrounding sky and water on fire? The picture you took doesn’t seem to capture what you had in your mind, does it?
From Smashing Magazine:
Click on the “New Fill/Adjustment Layer” button in the Layer palette and select “Gradient Map” from the list. Click on the gradient to open the “Gradient Editor.”
Click on the first color patch below the gradient, and change the color to red. Set the color patch on the opposite side to yellow, and click “OK.” Set the blending mode to “Soft Light” and reduce the opacity to about 50%. This will create a warm, almost golden sunset.
2. Skin Color
 Some hues that photos yield can pull vivid colors out and replace them with bland ones, making the subject lose some eyecatching vitality. Here’s a workaround for that.
From Smashing:
Go to New Adjustment Layer → Hue/Saturation. Click on the miniature mask, and press Control/Command + I to invert the mask.
Using white color and a soft brush, paint over the skin areas so that only they get treated. For the adjustment, switch from Standard to “Reds” (found in the Hue drop-down menu of the Adjustment layer), and use the Hue, Saturation and Lightness sliders to adjust the skin color. Switch to “Yellows” and optimize the skin tone. Getting the colors exactly right depends very much on the image material. Rely on your common sense.
3. Classy Sepia
 As Metzmacher says, the sepia look is an absolute classic. But it’s also easy to overdo in the wrong hands. To make sure you stay on the classy side, here’s Smashing’s sepia advice:
Click on Layer → New Adjustment Layer → Photo Filter, and select the Sepia filter, with a density of 100%. Double-click the layer (not the layer name) to open up the Layer Style window. This will show the Blending options.
At the bottom of the dialog box for the first gradient, move the white slider to the left while holding the Alt/Option key. This creates a smooth transition between adjusted and unadjusted areas. The sepia will now look elegant.
Again, visit Smashing Magazine to read the 14 other Photoshop tips. If you can wrap your head around all 17, I applaud your PS versatility.